
About software
Digital technologies are now essential in nearly every industry. In manufacturing, the high precision of machine-controlled operations and improved hardware reliability ensure optimal results. Today, almost all technical data - from digital photos to financial reports - is managed digitally.
However, some areas of process automation have been overlooked. Although numerical control (NC) devices preceded digital photography, there has long been a shortage of high-quality software solutions for NC editing.
While professional photo editing tools are easy to find, locating reliable, low-cost CNC editing software can be a challenge. CNC Syntax Editor by AGG Software changes this by providing a feature-packed environment for total control over your program files.
CNC Syntax Editor is a multi-window NC programming environment designed to edit, modify, upload, and download programs to numerically controlled devices. The application supports all types of ASCII CNC files and G-codes, ensuring high performance even with very large files.
The software features advanced syntax highlighting for commands and coordinates. By visually grouping these elements, it simplifies the development of NC programs. With highly configurable options, you can customize CNC Syntax Editor to suit your specific workflow and editing needs.
Another key advantage is the built-in toolset. These specialized functions allow you to mirror coordinates, shift or scale axis values, and switch axes quickly and accurately.
CNC Syntax Editor provides an intuitive interface suitable for both beginners and advanced programmers. While the interface is simple to navigate, it remains a powerful tool. The number and size of open documents are limited only by your available Windows memory.
While the standard menu commands will be familiar to most users, the "Tools" menu is specifically designed for CNC programmers. It simplifies complex tasks like scaling, mirroring, and renumbering code blocks. Syntax coloring and the ability to toggle spaces between words make the code significantly easier to read and help reduce the footprint of large files.
Supporting multiple documents simultaneously enables you to copy text between files, merge multiple programs, or reference older code formats for new applications.
In this manual, the terms "document", "file", and "text file" refer to the files containing your CNC programs.
DISCLAIMER:
The developers of this software have no control over how the application is used, how CNC programs are written, or how CNC machines are configured. Therefore, we accept no responsibility for any damage or injury resulting from files written or edited using this software.
As a twenty-one-day trial version with full functionality is provided for evaluation, the product warranty is limited to the replacement of defective software media.
For more information, to report bugs, or to provide feedback, please visit our website.
Company home page: https://www.aggsoft.com/
Software home page: https://www.cnc-syntax-editor.com/
Serial port hardware reference: https://www.aggsoft.com/rs232-pinout-cable/
Glossary
Baud Rate - The transmission speed of data through an asynchronous channel. Although often confused with bps (bits per second), baud rate actually refers to the number of signal changes per second. Because a single signal change can represent more than one bit of data, the bps rate is usually higher than the baud rate. For example, 2400 bps is typically transmitted at 600 baud.
Binary File - A computer file that contains data or program instructions stored in a binary format (1s and 0s), rather than readable ASCII text characters.
ASCII - An acronym for American Standard Code for Information Interchange. ASCII files are plain, unformatted text files that are recognized by almost any computer. Programs like Windows Notepad and most word processors can read and create ASCII files. They usually have the .TXT extension (for example, README.TXT).
Bytes - A group of eight bits that represents a single character, letter, or punctuation mark.
COM port - Short for serial communication port. Most DNC software communicates with a computer through this port. Standard PC architectures traditionally support up to four serial ports: COM1, COM2, COM3, and COM4. Additional ports can be installed using extra hardware.
CNC - Computer Numerical Control. Refers to machine tools equipped with a computer and memory to manage their operation. Almost all automated machine tools sold today are CNC. See also NC.
Data bits - A group of bits (1s and 0s) that represents a single character or byte. Typically, a transmission uses seven or eight data bits. During asynchronous communication, both devices must agree on the number of data bits. Data bits are preceded by a start bit and followed by an optional parity bit and one or more stop bits.
DNC - An acronym that stands for Distributed Numerical Control or Direct Numerical Control, depending on the application. Originally, DNC meant Direct Numerical Control, where a central computer provided machine instructions to an NC milling machine over data lines. Later, the term evolved to describe systems where multiple CNC machines are linked to a central computer or a local area network. In Distributed Numerical Control, NC programs are sent (distributed) directly to the memory of a CNC machine, and the program is run from that memory.
Flow control - A method of managing the amount of data exchanged between two devices. In data communications, flow control prevents one device from "flooding" the other with data. If data arrives faster than it can be processed, the receiving side stores it in a buffer. When the buffer is nearly full, the receiver signals the sender to pause until space becomes available. Hardware flow control is used between hardware components (like a PC and a modem), while software flow control is used between the communication programs.
Handshaking - The method used to regulate and control data flow between computers and hardware. There are two distinct types: software handshaking and hardware handshaking. An important distinction in interface signals is between data signals (the pins that actually transmit and receive characters) and control signals (all other pins used for management).
NC - Numerical Control. The operation of a machine using a series of coded instructions consisting of numbers, letters, and symbols. These instructions are translated into electrical pulses or other output signals that activate motors and devices to run the machine. On early NC machines, these signals were often delivered using punched tape. The term "NC machine" also refers to older machine tools that do not have a built-in computer and memory. See also CNC.
NC File - A file containing one or more programs written in the specific language used by Numerical Control machines.
NC Program - A set of instructions written in machine language and saved within an NC file.
Parity - In data communications, parity is a simple method for checking the integrity of transmitted data. The most common settings are Even parity (where the number of 1s in a data byte adds up to an even number) and None (where no parity bit is added).
PC - An abbreviation for Personal Computer.
Punch - A CNC output device used to export programs to perforated tape. These units can use either a parallel or serial connection.
RS232, RS423, RS422, AND RS485 - The Electronics Industry Association (EIA) established these standards for data communications. They were previously marked with the prefix "RS" to indicate a recommended standard. Today, they are generally referred to as "EIA" standards to identify the organization.
Electronic data communications generally fall into two broad categories: single-ended and differential. RS232 (single-ended) was introduced in 1962 and remains widely used, especially by CNC control builders. This specification allows data transmission from one transmitter to one receiver at relatively slow rates (up to 20,000 bits per second) over short distances (up to 50-feet at the maximum data rate). This 50 foot limitation can often be extended to 200 feet or more by using low-capacitance cable and reducing data rates to 9600 baud or lower.
RTS/CTS hardware handshaking - Uses additional wires to signal a sending device when to start or stop transmitting data. DTR and RTS are examples of these hardware handshaking lines. You can choose to use DTR or RTS individually or use both lines together for hardware flow control. See also XOn/XOff.
Stop bits - In data communication, one or two bits are used to mark the end of a byte or character. At least one stop bit is always transmitted.
Upload - To send one or more files from your local computer storage to a remote device. In a DNC environment, this usually means sending data from the CNC machine control back to the central DNC computer. It can also refer to sending files from your computer to another PC, an online service, or the internet.
Introduction
Highlights
•Customizable syntax highlighting.
•Customizable code snippets.
•Search and replace functionality.
•Upload programs to NC machines using DNC Precision.
•Intuitive editor with savable bookmarks.
•CNC-specific tools, including scaling, mirroring, and line numbering.
•Windows-themed interface.
•Multiple Document Interface (MDI) supporting multiple open windows.
•Support for Windows, Unix, and Mac line endings.
When you launch the program, the main application window opens (fig. 1), displaying the primary editing environment. The image below illustrates the CNC Syntax Editor interface with its key components labeled.
1. Menu bar - Menus are detailed in the Menus section of this help file.
2. Editor toolbar - Contains buttons for quick access to core editor functions.
3. Tools toolbar - Contains buttons for quick access to CNC programming tools.
4. Editor window - The main area for editing your programs. The title bar of this window displays the active file name. If a document has unsaved changes, an asterisk (*) appears next to the file name.
6. Editor popup menu - Right-click within the editor to access this context menu, which mirrors the Edit menu from the main menu bar.
7. Taskbar - Displays the file names of all open documents. Click a file's button to easily switch between documents.
8. Status bar - Displays the current status of the editor and other details, including:
•A brief description of the currently highlighted menu item.
•Line No.: The current line and column numbers of the text cursor.
•CAP: Indicates that Caps Lock is active; otherwise, it remains blank.
•NUM: Indicates that Num Lock is active; otherwise, it remains blank.
•OVR: Indicates that the editor is in overwrite mode. You can toggle this on and off using the Insert key.
9. Gutter - Displays line numbers and is used for setting bookmarks or selecting entire lines, as described in the Edit menu section.
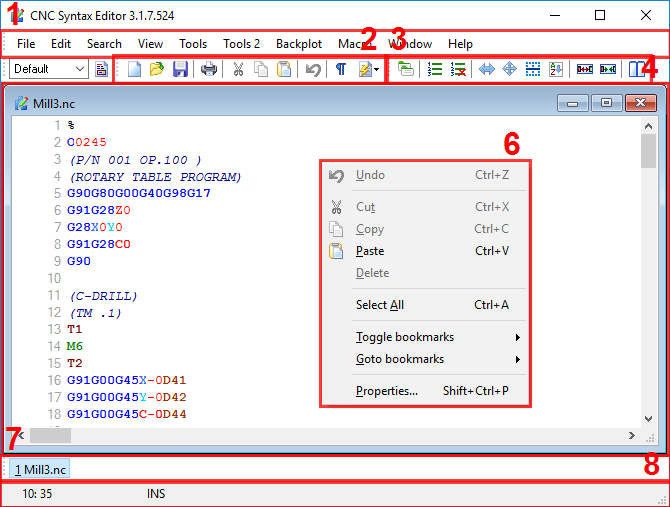
Fig. 1. The main program window
Most menus in CNC Syntax Editor feature built-in hints. For example, hovering your mouse over a menu item displays a description in the status bar, as shown in the screenshot below.
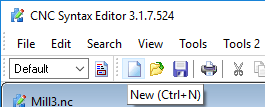
Fig. 2. Hint window
Configuring properties
Click "Edit - Properties..." in the menu to open the Properties dialog (fig. 3).
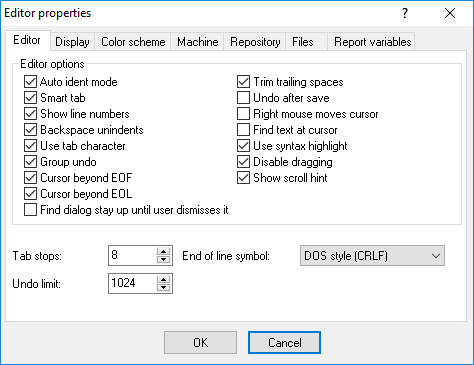
Fig. 3. Options window. The "General" tab
Here you can customize the appearance and behavior of the editor, adjust syntax highlighting colors, and enable or disable specific features.
Navigate through the tabs in the Options dialog box to configure the editor to your preferences.
General tab
Use the following options to control how the editor handles text. Check an option's box to enable it.
Auto indent mode - When you press Enter, this automatically positions the cursor under the first non-blank character of the preceding line.
Smart tab - Pressing Tab moves the cursor to the first non-whitespace character in the preceding line. Note: If "Use tab character" is enabled, this option is ignored.
Show line numbers - Displays line numbers in the editor gutter. Note that these refer to standard text lines, not CNC program blocks.
Backspace unindents - If the cursor is at the first non-blank character of a line, pressing Backspace moves it back to the previous indentation level.
Use tab character - Inserts a true tab character when you press the Tab key. If disabled, the editor inserts space characters instead. This option is ignored if "Smart tab" is enabled.
Group undo - Groups consecutive editing commands of the same type, allowing you to reverse the entire group at once when you press Alt+Backspace or choose "Edit - Undo".
Cursor beyond EOF - Allows you to move the cursor past the End-Of-File character.
Cursor beyond EOL - Allows you to place the cursor and make selections beyond the end of a line.
Trim trailing blanks - Automatically removes any spaces or tabs at the end of a line when saving.
Undo after save - Allows you to continue using the undo function even after saving the program.
Right mouse click moves cursor - Moves the text cursor to the location of your mouse pointer when you right-click.
Find text at cursor - Automatically places the word currently under the cursor into the "Text to find" field when you open the "Search - Find" dialog. If disabled, you must manually type the search text unless the field is left blank, in which case it will still use the selected text.
Use syntax highlighting - Turns on syntax coloring. You can customize these colors on the "Color scheme" tab.
Disable dragging - Prevents you from using the mouse to drag and drop selected text within the editor.
Show scroll hint - Displays a tooltip showing the top line number when you drag the scroll box.
Other options (when selected)
Tab stops - Defines the specific character columns the cursor will jump to when you press Tab. Each successive value must be larger than the previous one to avoid errors.
Undo limit - Specifies the maximum number of recent changes the undo function will remember.
End of line symbol - Specifies the type of line-ending characters (e.g., Windows, Unix, Mac). CNC Syntax Editor will apply this format when saving all files.
Display tab
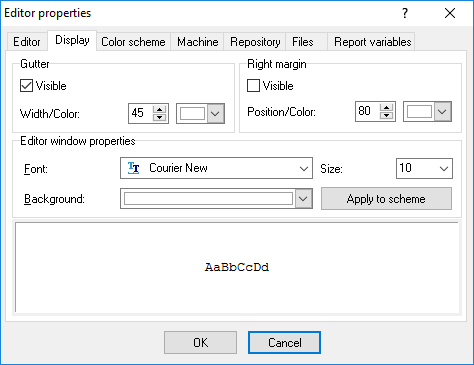
Fig. 4. Options window. The "Display" tab
Margin and gutter
Visible gutter - Shows or hides the gutter on the left side of the editor window.
Gutter color - Sets the background color of the gutter.
Margin position - Sets the maximum line length (in characters) to determine the position of the right margin line.
Margin color - Sets the color of the right margin line.
Editor font/Editor font size - Sets the font typeface and size used within the editor window.
Editor color - Sets the background color of the main editor window.
Color scheme
Use the "Color scheme" tab in the Options dialog box to specify how different elements of your code appear in the editor (fig. 5).
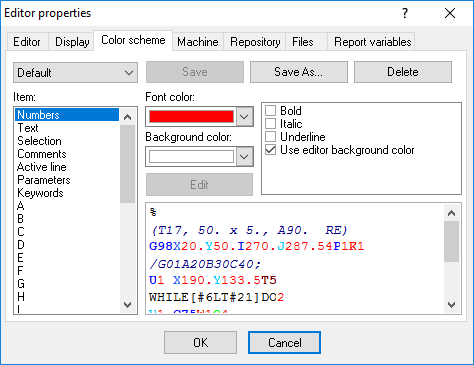
Fig. 5. Options window. The "Color scheme" tab
You can assign foreground and background colors to any element listed in the "Item" box. A preview area displays how your current settings will look in the editor.
Scheme - Allows you to quickly configure the editor display using predefined color combinations. The sample code reflects your selected scheme.
!Default! - Displays reserved words in bold text on a white background. This default scheme cannot be deleted.
Classic - Displays reserved words in white and standard code in yellow on a dark blue background.
Twilight - Displays reserved words in light blue and standard code in white on a black background.
Highlight - Displays reserved words in light blue and standard code in black on a white background. Otherwise, it is the same as the default scheme.
Item
Specifies the syntax highlighting format for a particular code element. You can select an element from the "Item" list box or click directly on an element within the sample editor.
The available elements include:
•Command - Any G-code command.
•Comment - Any text enclosed in parentheses ( ).
•Identifier - Tool parameters, tool selections, etc.
•Number - Any numeric value, including decimals.
•Parameter - Coordinate symbols (like X, Y, Z) following a G-code.
•Reserved word - Other alphabetical characters following a G-code.
•Sign - Positive (+) or negative (-) signs preceding numbers.
•Space - Blank spaces between code elements.
•Unknown symbols - Any unrecognized characters.
As you modify the colors for various language elements, the preview pane updates immediately so you can see the effect.
Foreground/Background Color - Sets the colors for the currently selected code element. The foreground color updates automatically for each item you choose. It is highly recommended to choose contrasting colors for the foreground and background; otherwise, the text will be unreadable.
Text attributes - Specifies formatting options for the code element. Available attributes are: Bold, Italic, and Underline.
Use the !default! scheme for:
•Applies default system colors to the foreground, background, or both for the selected code element.
•Unchecking either option restores your previously selected custom color. If no custom color was set, it leaves the system color applied.
Note: To change your underlying Windows system colors, you must use the Windows Control Panel.
Introduction
The CNC Syntax Editor menus are located on the menu bar, which can be moved to any location on your screen. The main menu consists of File, Edit, Search, View, Tools, Window, and Help. Each of these menus is described in detail below. Many menu functions can also be triggered using keyboard shortcuts (referred to as "hotkeys" in this manual) or by clicking toolbar buttons. By default, the toolbar is positioned just below the menu bar, but it can also be repositioned.
Additionally, you can access certain editing functions by right-clicking your mouse to open a context menu. Please refer to the specific sections for each function for more details. Hotkeys are formatted like this: "Ctrl+N" - meaning you should hold down the Ctrl key while simultaneously pressing the N key. The associated keyboard shortcuts and toolbar buttons are listed alongside each menu item.
Key mapping
Keystroke | Action |
|---|---|
UP | Cursor Up |
DOWN | Cursor Down |
LEFT | Cursor Left |
RIGHT | Cursor Right |
PAGE UP | Page Up |
PAGE DOWN | Page Down |
DELETE | Delete Char Right |
BACKSPACE | Delete Char Left |
Shift + BACKSPACE | Delete Char Left |
Shift + ENTER | Enter |
ENTER | Enter |
TAB | Tab |
Ctrl + LEFT | Jump Word Left |
Ctrl + RIGHT | Jump Word Right |
Shift + DOWN | Mark Down |
Shift + UP | Mark Up |
Shift + LEFT | Mark Left |
Shift + RIGHT | Mark Right |
Shift + HOME | Mark To Line Begin |
Shift + END | Mark To Line End |
Shift + PAGE UP | Mark Page Up |
Shift + PAGE DOWN | Mark Page Down |
Ctrl + C | Copy To Clipboard |
Ctrl + X | Cut To Clipboard |
Ctrl + V | Paste From Clipboard |
Ctrl + Z | Undo |
Shift + Z | Redo |
Ctrl + F | Show Search Dialog |
Ctrl + R | Show Replace Dialog |
F3 | Key Find Next |
Ctrl + E | Key Find Next |
Ctrl + L | Key Find Next |
Ctrl + Y | Delete Line |
Ctrl + Shift + Y | Delete To Line End |
Ctrl + T | Delete Word Right |
Ctrl + N | Insert Line |
Ctrl + I | Press Tab |
Ctrl + A | Select All |
Shift + I | Indent Block |
Shift + U | Outdent Block |
Ctrl + Home | Jump To File Begin |
Ctrl + End | Jump To File End |
Ctrl + Down | Scroll Down |
Ctrl + Up | Scroll Up |
File menu
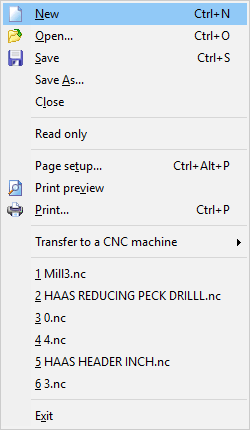
Fig. 6. The file menu
New
Hotkey: Ctrl+N
Creates a new file. New files are automatically named "NoName1.ncp", with the number increasing for each subsequent new document (e.g., "NoName2.ncp", "NoName3.ncp"). Because CNC Syntax Editor supports a multiple-document interface, your existing open documents remain open when you create a new one.
Open
Hotkey: Ctrl+O
Opens an existing file. A dialog box will prompt you to browse for the file's location. Larger files may take a moment to load. The default directory is the installation folder for CNC Syntax Editor.
Save
Hotkey: Ctrl+S
Saves the active file to its current location. If you are saving a new file for the first time, a dialog box will appear allowing you to select the drive, folder, and file name. This command is only available when at least one file is open.
Save as
Saves the active file to a new location or with a new name that you specify. This command is only available when at least one file is open.
Close
Closes the active file. If the document contains unsaved changes, CNC Syntax Editor will prompt you to save them before closing.
Hotkey: Ctrl+P
Opens the Print dialog, allowing you to select a printer and configure its options. If you click the Print button on the toolbar instead, CNC Syntax Editor will immediately print the active document to your default printer without opening the dialog box.
Page Setup
Configures formatting options for printing your document. Paper size and orientation are configured through the print setup dialog (fig. 7).

Fig. 7. Page setup
•Units - Specifies the unit of measurement for the margins.
•Size - You can select a standard paper size from the list or specify the exact sheet size in the chosen units of measurement.
•Orientation - The paper orientation for printing.
•Margins - Sets the white space between the text and the page edges.
Print View
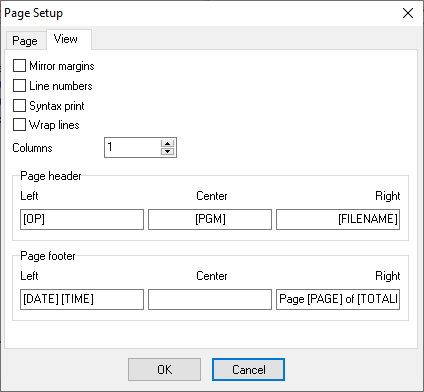
Fig. 8. Page view setting
•Mirror margins - Mirrors the margins for double-sided printing.
•Line numbers - Prints line numbers alongside the text.
•Syntax print - Prints the text with syntax highlighting.
•Wrap lines - Wraps long lines of text so that they fit within the printed margins.
•Columns - Prints the control program text in multiple columns on a single page to save paper.
•Page Header and Footer - Adds fixed text with variables at the top and bottom of the page. Variables are added in the format [VARIABLE_NAME].
Variable names that can be used in headers and footers:
•FILE - The full name of the edited file, including the path.
•FILENAME - The name of the edited file.
•PAGE - The page number.
•DATE, TIME - The current date or time in the operating system format.
•TOTALPAGES - The total number of printed pages in the file.
Transfer to a CNC machine
CNC Syntax Editor relies on the DNC Precision software by AGG Software to upload files to a CNC machine. Please refer to the DNC Precision manual for instructions on configuring your machines.
Recent File List
Located in the File menu between Page Setup and Exit, this section displays a list of recently opened documents. Click any file name in this list to quickly reopen it for editing.
Exit
Closes CNC Syntax Editor and all open files. You will be prompted to save any documents with unsaved changes before the application exits.
Edit menu
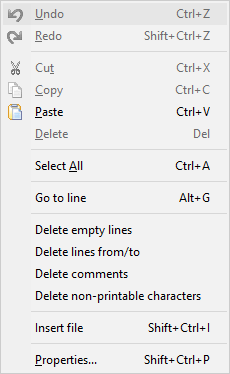
Fig. 9. The Edit menu
Undo
Hotkey: Ctrl+Z
Right-click menu
Choose "Edit - Undo" to reverse your most recent keystrokes or mouse actions.
Using Undo in the editor
Undo can reinsert deleted characters, delete inserted characters, replace overwritten characters, or move your cursor back to its previous position. You can undo multiple actions by selecting Undo repeatedly. This removes your changes by stepping back through your recent actions and reverting them to their previous state.
To specify an undo limit:
1. Choose "Edit - Properties", and click the General tab.
2. In the "Undo limit" box, enter the maximum number of undo steps you want to retain.
Note: You can only undo changes after saving a file if you enable the "Undo after save" option on the General tab.
If you undo a block operation, your file will revert to its exact state before the block operation was executed.
Note: The Undo command does not revert option settings that affect multiple windows.
Redo
Hotkey: Shift+Ctrl+Z
Choose "Edit - Redo" to reverse the effects of your most recent Undo. Redo is only available immediately after using the Undo command.
Cut
Hotkey: Ctrl+X
Right-click menu
Choose "Edit - Cut" to remove the selected text from its current position and place it on the clipboard. The Cut command replaces the current clipboard contents with the selected text. To insert the clipboard contents elsewhere, choose "Edit - Paste". You can also access this function by right-clicking the selected text.
Copy
Hotkey: Ctrl+C
Right-click menu
Choose "Edit - Copy" (or right-click and select Copy) to place an exact copy of the selected text on the clipboard while leaving the original text untouched. The Copy command replaces the current clipboard contents with the selected text. To insert the copied text elsewhere, choose "Edit - Paste".
Paste
Hotkey: Ctrl+V
Right-click menu
Choose "Edit - Paste" to insert the contents of the clipboard into the active document.
Note: You can only paste text into the editor window.
The text is inserted at the current cursor position. You can also right-click in the editor and choose Paste from the context menu. You can paste the clipboard contents as many times as needed until you Cut or Copy a new item.
Delete
Hotkey: Delete
Right-click menu
Choose "Edit - Delete" to remove the selected text without placing a copy on the clipboard. Although you cannot paste a deleted item, you can restore it by immediately choosing "Edit - Undo".
Delete is useful when you want to remove text without overwriting your current clipboard contents. You can also access this function by right-clicking the selected text.
Select all
Hotkey: Ctrl+A
Choose "Edit - Select all" to select all text in the active document.
Go to line
Hotkey: Alt+G
This command allows you to jump directly to a specific line number. Choose "Edit - Go to line" and enter the desired line number in the dialog box.
Delete empty lines
This removes all empty lines (lines without any text) from your document. You can restore them by immediately choosing "Edit - Undo".
Delete lines from/to
This removes a specified range of lines from your document. When you select this menu item, a dialog box will appear asking you to specify the starting and ending line numbers. You can restore the lines by immediately choosing "Edit - Undo".
Delete comments
This removes all comments enclosed in parentheses () from your document, which helps reduce the file size. You can restore them by immediately choosing "Edit - Undo".
Delete non-printable characters
This removes all characters with a decimal ASCII code from 0 to 32 and from 128 to 255 from your document. You can restore them by immediately choosing "Edit - Undo".
Insert file
Choose "Edit - Insert file" to insert the entire contents of another file into your active document. Selecting this menu item opens a dialog box where you can browse for the file you want to insert.
The text will be inserted at the current cursor position. You can reverse this action by immediately choosing "Edit - Undo".
Properties
This opens the Properties dialog window.
Search menu
Find
Hotkey: Ctrl+F
Choose "Search - Find" to display the Find Text dialog box (fig. 10).
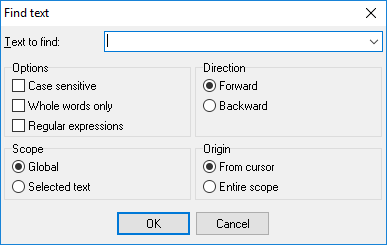
Fig. 10. Find text dialog box
Find Text dialog box
Use this dialog box to specify the text you want to locate and configure your search options. The Find command locates and highlights the first occurrence of the search string.
Dialog box options
Text to find - Enter a search string or click the down arrow next to the input box to choose from a list of recent searches.
Options - Specifies attributes for the search string:
•Case sensitive - Differentiates between uppercase and lowercase letters during the search.
•Whole words only - Restricts the search to complete words. If disabled, the search string may be found embedded within longer words.
•Regular expressions - The search uses a standard regular expression from the text field.
Direction - The direction of the search, starting from the current cursor position:
•Forward - Searches from the current position to the end of the file. This is the default setting.
•Backward - Searches from the current position to the beginning of the file.
Scope - Determines how much of the file is searched:
•Global - Searches the entire file in the specified direction. This is the default scope.
•Selected text - Searches only within the highlighted text in the specified direction. You can use your mouse or keyboard shortcuts to select a block of text.
Origin - Determines where the search begins:
•From cursor - The search starts at the current cursor position and proceeds either forward or backward depending on the Direction setting. This is the default origin.
•Entire scope - The search covers the entire file or the entire selected block of text, depending on your Scope setting, regardless of the cursor's current position.
Find next
Hotkey: F3
Repeats the last search using your most recent options.
Replace
Hotkey: Ctrl+R
Choose "Search - Replace" to display the Replace Text dialog box (fig. 11).
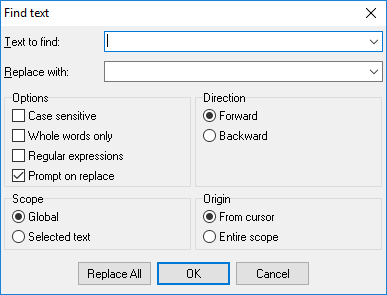
Fig. 11. Replace text dialog box
Replace Text dialog box
Use this dialog box to locate specific text and replace it with new text (or delete it entirely). Most components here are identical to those in the Find Text dialog box.
Text to find - Enter the string you want to locate. To choose from recent searches, click the down arrow next to the input box.
Replace with - Enter the new text. You can also click the down arrow to choose from recent replacement strings. To simply delete the found text, leave this box blank.
Prompt on replace - Asks for your confirmation before replacing each occurrence. If this is disabled, the editor will automatically replace the text without asking.
Replace All - Click this to automatically replace every occurrence of the search string in the document. If "Prompt on replace" is enabled, you will still be asked to confirm each change.
Next tool change
Hotkey: Ctrl+T
Choose "Search - Next tool change". The editor will scan forward through the file for the next tool change command (M06) and reposition the cursor at that line.
Previous tool change
Hotkey: Ctrl+Shift+T
Choose "Search - Previous tool change". The editor will scan backward through the file for the preceding tool change command (M06) and reposition the cursor at that line.
Bookmarks
Toggle bookmarks
Right-Click Menu
Hotkeys:
Shift+Ctrl+0 - Sets/replaces bookmark 0
Shift+Ctrl+1 - Sets/replaces bookmark 1
Shift+Ctrl+2 - Sets/replaces bookmark 2
Shift+Ctrl+3 - Sets/replaces bookmark 3
Shift+Ctrl+4 - Sets/replaces bookmark 4
Shift+Ctrl+5 - Sets/replaces bookmark 5
Shift+Ctrl+6 - Sets/replaces bookmark 6
Shift+Ctrl+7 - Sets/replaces bookmark 7
Shift+Ctrl+8 - Sets/replaces bookmark 8
Shift+Ctrl+9 - Sets/replaces bookmark 9
This command places a mark beside the line holding the cursor. The mark is visible as a rectangle with a number on the gutter. If the line is already marked, "Toggle Bookmark" removes the bookmark.
Go to bookmarks
Right-Click Menu
Hotkeys:
Ctrl+0 - Goes to bookmark 0
Ctrl+1 - Goes to bookmark 1
Ctrl+2 - Goes to bookmark 2
Ctrl+3 - Goes to bookmark 3
Ctrl+4 - Goes to bookmark 4
Ctrl+5 - Goes to bookmark 5
Ctrl+6 - Goes to bookmark 6
Ctrl+7 - Goes to bookmark 7
Ctrl+8 - Goes to bookmark 8
Ctrl+9 - Goes to bookmark 9
Moves the cursor position in the editor window to a bookmark.
View menu
Use the View menu commands to show or hide various elements of the interface and manage open windows within the editor environment.
Non-printable symbols - Shows or hides all characters with an ASCII decimal code less than 32, such as tabs and line feeds.
Separate commands - Enables the visual separation of NC commands within a single line of code. The program virtually inserts a space between commands and coordinates in all lines.
Choose "View - Toolbars" to show or hide the following components in the editor environment:
•Standard - Includes New, Open, Save, Save All, Print, Copy, Cut, Paste, etc.
•Tools - Includes Code repository, Lines numbering, Shift, Scale, Mirror, Exchange axes, Add spaces, and Remove spaces.
•Task bar - Displays the file names of all open documents.
•Status bar - Displays the current status of the editor environment.
Check the items you want to display and uncheck those you want to hide. The toolbars provide shortcut icons for frequently used actions.
Locked scrolling - When two windows are open, enabling this option synchronizes their scrolling. If you scroll the first window, the second window will scroll simultaneously and vice versa.
Code repository
The Code repository ("Tools - Code repository") (fig. 12) provides templates for new projects and stores frequently used code blocks. The repository is maintained in the Repository folder (located within the directory where CNC Syntax Editor is installed), which contains individual files for all stored items. It is not designed to save entire large files, but rather code segments up to 16 KB.
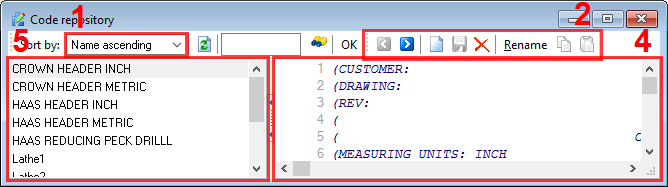
Fig. 12. Code repository dialog box
Choose "Tools - Repository" or click the Code repository button ![]() to display the Code repository dialog box.
to display the Code repository dialog box.
Items description
1. Sorting toolbar - Allows you to set the sorting order for the item list.
2. Buttons toolbar - Contains buttons for quick access to core repository functions:
o![]() Previous - Selects the previous item in the item list.
Previous - Selects the previous item in the item list.
o![]() Next - Selects the next item in the item list.
Next - Selects the next item in the item list.
o![]() New - Adds a new item to the item list. After clicking this button, CNC Syntax Editor creates the item and allows you to rename it. To change an item's description, perform a slow double-click on the item name (click - pause - click).
New - Adds a new item to the item list. After clicking this button, CNC Syntax Editor creates the item and allows you to rename it. To change an item's description, perform a slow double-click on the item name (click - pause - click).
o![]() Save - Saves the currently modified item.
Save - Saves the currently modified item.
o![]() Delete - Deletes the currently selected item.
Delete - Deletes the currently selected item.
o![]() Copy - Copies the contents of the current item to the clipboard.
Copy - Copies the contents of the current item to the clipboard.
o![]() Paste - Pastes the contents of the clipboard into the repository window.
Paste - Pastes the contents of the clipboard into the repository window.
Search toolbar - Allows you to search for specific text across all items in the repository. Type any text and click the Search ![]() button. CNC Syntax Editor will locate the first occurrence of the text. Click the Search button again to find the next occurrence. You can use the wildcard characters "?" and "*" while searching, where "?" represents any single character and "*" represents a group of one or more characters.
button. CNC Syntax Editor will locate the first occurrence of the text. Click the Search button again to find the next occurrence. You can use the wildcard characters "?" and "*" while searching, where "?" represents any single character and "*" represents a group of one or more characters.
3. The Repository editor window - Here you can view and edit your repository items. This editor uses the same syntax highlighting and editing options as the main editor windows.
4. The item list - This list displays the names of all items stored in the repository. Click any item in the list to select it and load its contents into the Repository editor window.
Adding a new code item
1.Click the New button to add a new item to the repository.
2.Type a name for your item.
3.Type or paste your code into the Repository editor window.
4.Click the Save button.
Inserting a code item into a CNC file
1.Click the name of the desired code item in the item list.
2.Click the Copy button.
3.Minimize or close the Code repository window.
4.Press Ctrl+V, click the Paste toolbar button, or right-click the mouse and select Paste.
Removing a code item
Select the name of the item in the item list and click the Delete button.
Searching all code items for text
1.Type your search text into the search bar.
2.Click the Search button.
Renumber lines
Renumber lines
This feature allows you to add or remove line numbers in your code. The editor uses standard CNC line numbers formatted as Nnnnn. When adding numbers, you can sequence each line consecutively or start at a specific number and increment by a custom value. To add line numbers, click "Renumber lines" to open the dialog box (fig. 13).
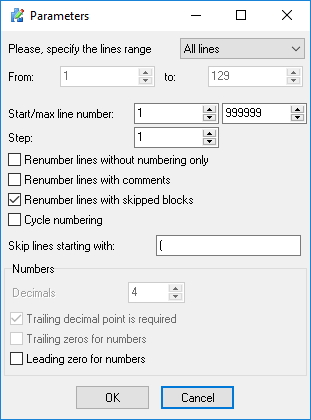
Fig. 13. Renumber lines dialog box
This dialog allows you to choose which section of the code to process. By default, it spans from the "First line" to the "Last line" of the file. To process a specific range, check the corresponding boxes and enter the desired line numbers. Please note that these inputs refer to standard document line numbers, not CNC block numbers (Nnnnn).
The status bar displays the document line number where your cursor is currently located. You can also define the section to process by highlighting the text before opening the dialog.
Start line number - The starting number for the sequence. Only integer values are allowed.
Step - The amount by which each subsequent line number will increase. Only integer values are allowed.
Renumber lines without numbering only - Checking this box adds a block number exclusively to lines that do not currently have one. Lines beginning with N, O, P, or any non-alphabetical character will be ignored.
Renumber lines with comments - Checking this box adds numbering to lines containing comments (typically enclosed in parentheses).
Renumber lines with skipped blocks - Checking this box adds numbering to lines starting with a "/".
Cycle numbering - If the control program has too many lines and exceeds the line numbering capacity, for example, from 0001 to 9999, CNC Syntax Editor will restart the numbering from the beginning. This means line numbers may repeat within the program. Otherwise, the software will stop when it reaches the maximum line number.
Digits - Specifies the maximum number of digits in the line number. A value of 4 sets the line number range from 0000 to 9999.
Trailing decimal point is required - If enabled, the software adds a decimal point to all numbers (except line numbers), even if the fractional part contains only zeros. For example, "X43.0000" will be represented as "X43.", otherwise it will be "X43".
Trailing zeros for numbers - If enabled, the software keeps non-significant zeros in the fractional part. For example, X43.2100.
Leading zero for numbers - CNC Syntax Editor will pad line numbers with leading zeros to maintain a consistent length. For example, if your last line number will be 9999 and your first line number is 10, the software will format the first line as N0010.
Remove line numbers
Removes all CNC block numbers from the active file.
Check for duplicate line numbers
This function (Tools 2 - Check for duplicate line numbers) scans your CNC program to identify any duplicate block numbers (such as multiple instances of N0010). Finding and resolving duplicate line numbers is crucial to prevent erratic machine behavior or errors during subprogram calls and jumps.
Shift/Scale/Mirror
Shift
This command allows you to add or subtract an amount from selected axis (address) values, either within a specific section or across the entire file. Use the "Shift value" dialog box to define the section of the file you want to process (fig. 14).
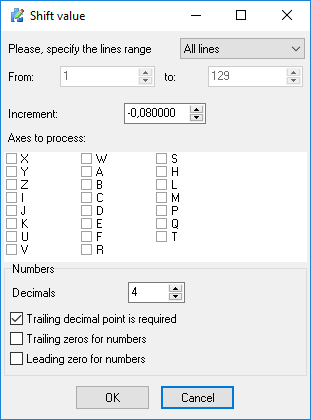
Fig. 14. Shift value dialog box
Select the axes to be processed and enter a positive or negative amount in the "Increment" field. Then, click the "OK" button.
Before processing the file, CNC Syntax Editor will prompt you to create a backup copy of your current file.
Scale
Use this dialog box to multiply one or more code addresses by a specific scale factor. An ideal use for this command is converting programs from inches to metric and vice versa. Most options in the Scale dialog box are identical to those in the Shift dialog box.
Factor - Scaling factor. If the factor is less than 1, a reduction is actually performed.
Mirror
The Mirror command changes all occurrences of one or more code values from positive to negative and vice versa. It also provides options to reverse the arc cutting direction and tool radius compensation. Most components of the Mirror dialog box are identical to those in the Shift dialog box. When "Mirror" is selected, you can reverse the arc cutting direction by checking the "G02<-→G03" box and toggle the cutter diameter compensation between right and left by checking the "G41<-→G42" box.
Note:
•All the commands above can be applied to the entire file or a specific section by using the "From" and "To" fields.
•Before applying any of these changes, CNC Syntax Editor will prompt you to create a backup copy of the active file.
Exchange axes
This function allows you to swap the values of one coordinate axis (address) with another (fig. 15). Most options in the Exchange axes dialog box are identical to those in the Shift dialog box.
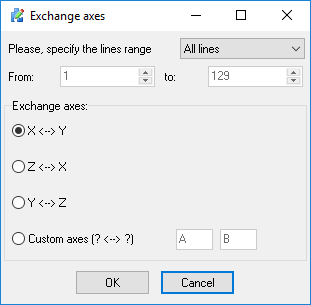
Fig. 15. Exchange axes dialog box
Select the axes you wish to swap from the "Exchange axes" group, and click "OK". Every occurrence of the first axis in a line will be replaced by the second axis, and vice versa. You can swap values between any axes. Simply select the "Custom axes" option from the "Exchange axes" group and type the names of your desired axes.
Note:
•This command can be applied to the entire file or restricted to a specific section by using the "From" and "To" fields.
•Before processing the file, CNC Syntax Editor will prompt you to create a backup copy of your active file.
Add and remove spaces
This feature allows you to insert spaces into your file to improve readability or remove spaces to reduce the overall file size. The "Add spaces" command inserts a space before every letter that follows a G-code. The "Remove spaces" command deletes all spaces within the file. If you only want to add spaces visually on the screen without modifying the actual file, use the Separate commands option.
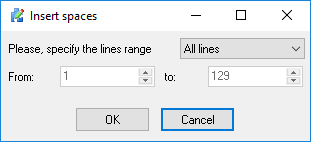
Fig. 16. Add and remove spaces dialog box
Note:
•These commands can be applied to the entire file or restricted to a specific section by using the "From" and "To" fields.
•Before processing the file, CNC Syntax Editor will prompt you to create a backup copy of your active file.
Compare files with WinDiff
WinDiff is a file compare application that is provided by Microsoft. WinDiff has its own Help. However, the following instructions will get you started.
When you choose WinDiff from the Tools menu, the Open file dialog appears. Enter the names of the files you wish to compare, or use the browse button to search through your folders, or choose from recently compared files by using the down arrow button.
Change characters' case
Uppercase
From the "Tools 2" menu, select "Uppercase". All characters in the active file will be converted to uppercase letters.
Lowercase
From the "Tools 2" menu, select "Lowercase". All characters in the active file will be converted to lowercase letters.
Adjusting spindle speed and feed rate
Adjust spindle speed
The Adjust spindle speed command allows you to quickly modify the spindle speeds within a CNC program. If text is selected, the changes are applied only to that selection. If no text is selected, the command applies to either the entire file or the current line, depending on your preferences. To adjust the spindle speed, specify the following parameters:
New value - Enter a percentage to scale the current spindle speed (for example, entering 100% maintains the current value).
Minimum - Sets a lower limit to ensure the spindle speed does not drop below this value.
Maximum - Sets an upper limit to ensure the spindle speed does not exceed this value.
Decimals - Specifies the number of decimal places to include.
Adjust feed rate
The Adjust feed rate command allows you to quickly modify the feed rates within a CNC program. If text is selected, the changes are applied only to that selection. If no text is selected, the command applies to either the entire file or the current line, depending on your preferences. To adjust the feed rate, specify the following parameters:
New value - Enter a percentage to scale the current feed rate (for example, entering 100% maintains the current value).
Minimum - Sets a lower limit to ensure the feed rate does not drop below this value.
Maximum - Sets an upper limit to ensure the feed rate does not exceed this value.
Decimals - Specifies the number of decimal places to include.
Rotate
The Rotate function allows you to rotate all coordinates in your file around a specific center point (fig. 17). Rotation can occur in any plane (XY, XZ, or YZ) and can automatically detect the G90 and G91 status in your program. When rotating in the XY plane, the X and Y values are rotated, while the Z value is not affected. Similarly, when rotating in the XZ plane, the X and Z values are rotated, and the Y value is unchanged. Please note that the rotation function does not support 3-axis circular moves (spherical interpolation) where all three axes are programmed in the same block. In such cases, only the two selected axes are rotated, and the third axis remains unaffected.
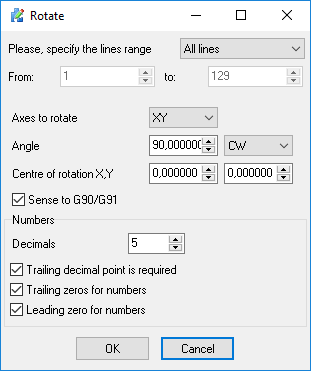
Fig. 17. Rotate program
Axes to rotate - Select the plane for rotation (XY, XZ, YZ).
Angle - Enter the rotation angle in degrees.
Center of rotation - Enter the coordinates for the center of rotation for the selected plane (e.g., X for the first axis, Y for the second axis).
Decimals - Specify the number of decimal places to include.
Sense to G90/G91 - Check this box to allow the program to automatically detect the G90 (absolute) and G91 (incremental) positioning modes in your code.
Find XYZ ranges
The Find XYZ ranges function scans your program to determine the maximum and minimum values for each axis. This function does not alter the contents of your file; it simply displays the calculated limits. In addition to standard X, Y, and Z axis motions, you can also view the maximum and minimum values for spindle speeds, feed rates, A, B, and C axes, and the overall dimensions of your part.
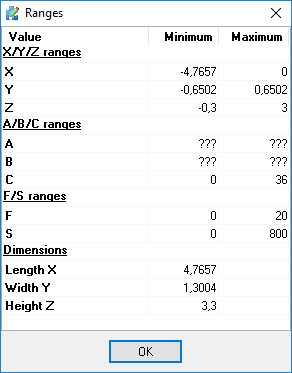
Fig. 18. Find XYZ ranges
Advanced tools
The editor provides several advanced tools to manipulate your CNC code and automate repetitive tasks. These commands are typically accessed via the Tools menu.
Clone axis
The Clone axis command allows you to duplicate the values of a specified coordinate axis (address) and assign them to a new axis. For example, you can duplicate all X-axis movements to a U-axis. This is particularly useful for multi-axis machines or special subprogram requirements. You can apply this command to the entire file or restrict it to a selected block of text.
Remove axis
The Remove axis command deletes all occurrences of a specified axis and its corresponding values from your code. This is helpful when stripping unnecessary coordinates from a program to adapt it for a different machine. Like other axis tools, it can be applied globally or to a specific text selection.
Macro editor
The Macro editor allows you to automate repetitive editing tasks by recording a sequence of keystrokes and actions, which can then be played back as needed. The macro tools include:
•Start recording - Begins recording your keystrokes and editor actions.
•Stop recording - Ends the macro recording process.
•Play from file - Loads a previously saved macro from your disk and executes it in the active document.
•Replay - Executes your most recently recorded macro exactly once.
•Repeat macro N times - Prompts you to enter a number and then executes the current macro that many times consecutively. This is ideal for quickly formatting long, repetitive blocks of code.
Backplotter
The Backplotter (NC program debugger) is a powerful simulation tool that translates your CNC code into a 3D visual representation. This allows for graphical verification of your code before you run it on your physical machines, helping to catch errors and prevent costly crashes.
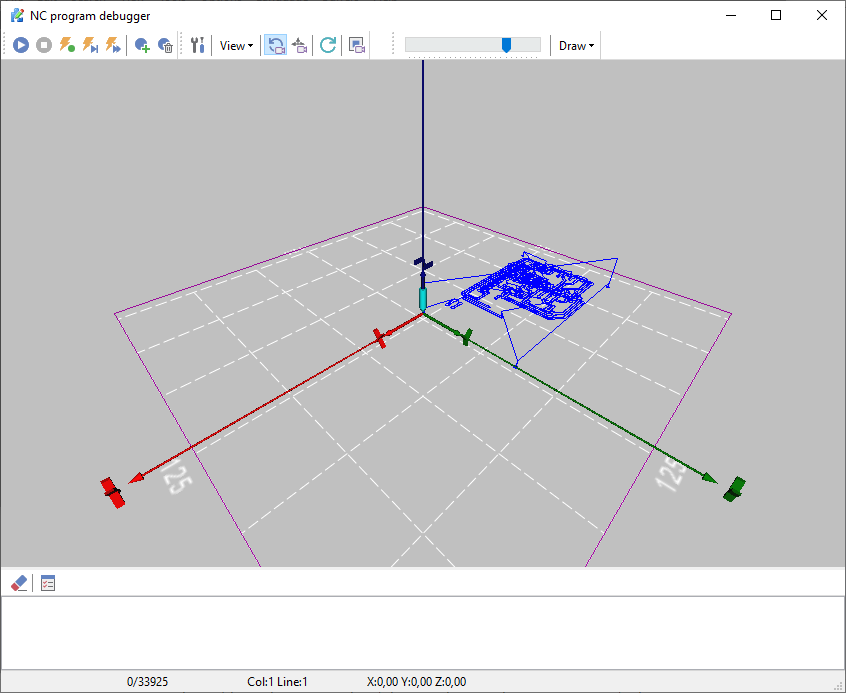
Fig. 19. Backplotter
Main functions overview
The Backplotter environment provides several key capabilities to help you analyze and debug your CNC programs:
•Graphical verification: See a complete 3D rendering of the toolpath to ensure the programmed movements match your intended design.
•Synchronized code viewing: View your source code side-by-side while the back-plot is actively drawing, making it easy to link specific visual movements to exact lines of code.
•Slow motion playback: Execute the simulation in slow motion to carefully inspect intricate cuts and complex tool trajectories.
•Real-time positioning: Monitor the exact X, Y, and Z coordinates, along with the current line and column number, dynamically updating in the status bar at the bottom of the window.
How to use
Operating the Backplotter is similar to using a standard media player, utilizing the toolbar at the top of the window:
•Playback controls: Use the Play, Stop, Step Forward, and Step Backward buttons to control the execution of the toolpath simulation.
•Add and remove breakpoints - to stop executing the NC program at the necessary line.
•Speed adjustment: Use the horizontal slider next to the playback controls to speed up the simulation or slow it down for detailed inspection.
•Viewport manipulation: Use the mouse or the View toolbar buttons to Rotate, Pan, and Zoom the 3D grid. This allows you to inspect the toolpath from multiple angles and perspectives.
•Standard views: Quickly switch between standard perspectives (2D XY, XZ, YZ, and 3D views) using the dedicated camera icons on the toolbar.
Draw settings
The Backplotter can be customized to match your specific machine setup and viewing preferences using the "Draw" and "View" menus, as well as the tool configuration icon (wrench and screwdriver):
•Lines - Displays the tool movement paths as thin, continuous lines.
•CW (G02), CCW (G03) circles - Renders visible arcs for clockwise (G02) and counter-clockwise (G03) circular interpolation commands.
•Grid - Toggles the visibility of the reference grid on the base plane to help establish a sense of scale.
•Tool and scene axis - Toggles the visibility of the X, Y, and Z coordinate axes for the cutting tool and the overall 3D scene independently.
Backplotter settings
The Backplotter Options dialog allows you to extensively customize the appearance and behavior of the NC program debugger. You can access these configurations through three primary tabs: Debugger, Graphics, and Log.
Debugger tab
This tab controls the visual indicators and execution rules used while stepping through your CNC code.
•Current program line (font/background) - Defines the text and background colors used to highlight the line of code currently being executed.
•Breakpoint (font/background) - Defines the text and background colors used to highlight lines where breakpoints have been set.
•Pause program execution on error - When checked, the simulation will automatically halt if it encounters an error in your G-code, allowing you to inspect the issue immediately.
•Clear log on start - Automatically empties the message log each time you start a new debugging session.
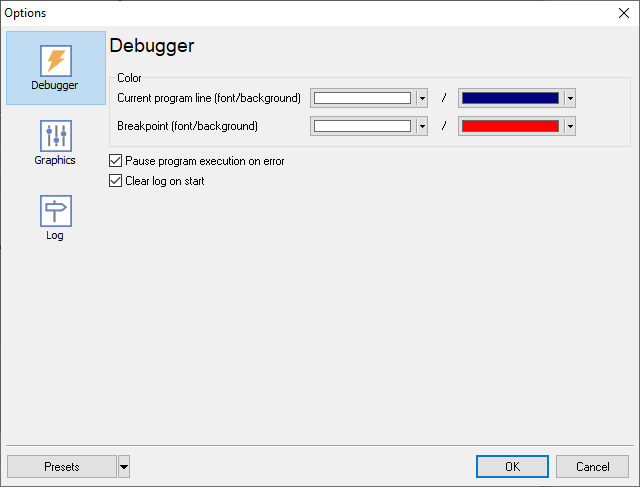
Fig. 20. Debugger settings
Graphics tab
This tab allows you to adjust the visual elements of the 3D simulation environment.
•Scene - Allows you to change the overall Background color of the 3D viewport. Click "Advanced..." for more granular color controls.
•Tool - Check the "Show" box to display the simulated cutting tool. You can also customize the tool's Color to contrast better with your background.
•Base - Specifies the Color of the reference grid and base plane.
•Camera - Adjust the default viewing Distance. A lower value zooms the camera in closer to the workpiece.

Fig. 21. Graphics settings
Log tab
This tab provides comprehensive control over how system messages, warnings, and errors are recorded and displayed.
•Font - Customize the typography of the log output. You can select the font Name, Size, and apply styles such as Bold, Italic, Underline, or Strike out.
•Colors - Set specific text colors to easily distinguish between "Common text" and "Errors".
•Max lines - Defines the maximum number of history lines the log will retain before discarding older entries (e.g., 1000).
•Enable logging - Toggles the recording of messages on or off.
•Show message log - Toggles the visibility of the log panel within the debugger interface.
•Message filter - This list allows you to selectively choose which events are recorded. You can check or uncheck "Error" notifications, as well as specific G-codes (such as G00, G01, G02, etc.), ensuring your log only captures the exact information you need.
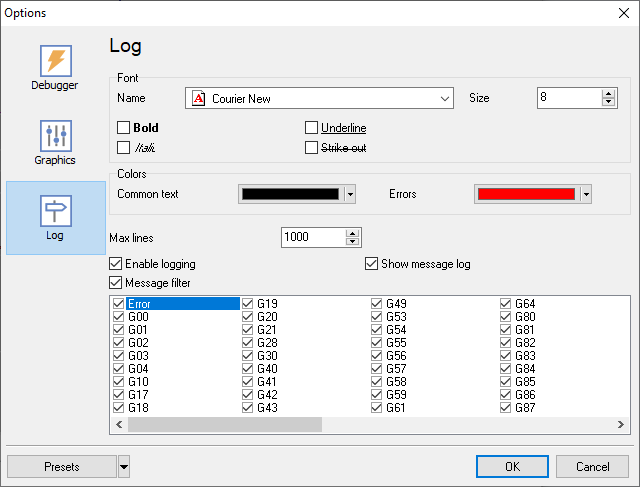
Fig. 22. Log settings
Windows menu
The Window menu provides commands such as Tile, Cascade, and Arrange Icons, offering an easy way to organize open documents within the main editor workspace.
Cascade
Arranges all open, non-minimized windows into an overlapping, cascading stack. Click the title bar of any window to make it active and bring it to the front.
Tile horizontally or vertically
Arranges all open, non-minimized windows so they are equally visible on the screen without overlapping. Tiling horizontally stacks the windows from top to bottom. Tiling vertically places them side by side from left to right.
Arrange Icons
When you minimize a window, it appears as an icon at the bottom of the workspace. This command neatly arranges these minimized window icons into rows. Note that these icons will be hidden if any other document window is currently maximized.
List of the open document windows
The bottom of the Window menu displays a list of all currently open documents, allowing you to quickly switch between them. The active document is indicated by a check mark next to its name.